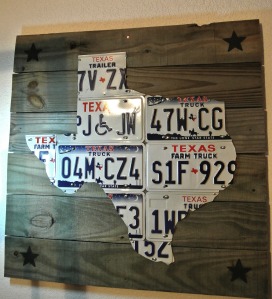
As you all may know, we think everything is bigger in Texas. So why not upcycle something to represent my great state. You’ve probably seen these pictures around everywhere from Target to Bed Bath & Beyond.
I’ve always liked these, but thought “what if we just did Texas?” WE, because this took 3 of us (me, G the hubs, and our son) to work with license plates. I went to the DMV (Dept of Motor Vehicle) and asked if for some strange reason people actually returned their old plates to them when they were issued new ones. The lady told me, “you would be surprised how many we get returned to us.” So in true junkin’ fashion, I asked her if I could have some. She gave me about 30 of them for free. They were a little dirty, but so what they were free.
The first thing I did was give them all a good washing with dish soap and water. Then once they were dry I picked out the cleanest ones. We needed a pattern to shape these plates into Texas, so in comes the Texas size pattern out of cardboard.
We then put the plates side by side, to form a large square that was bigger than our pattern. We flipped them all over and laid the pattern on them backwards. Next we drew around the pattern on the plates so the state of Texas was drawn backwards on the back of our square of plates. So sorry I didn’t take a picture of this, I totally forgot. We got so busy trying to keep it all lined up that I forgot to snap a pic.
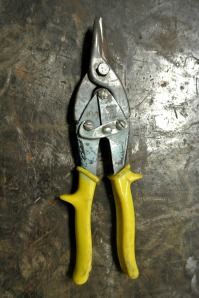
Then we needed to cut each plate to form the borders of the state with tin snips. These are just like big scissors for tin. This took all 3 of us because it was SLOW going with all those river boundaries. If you do this with a state that has straight lines it will be a lot easier.
Cut your pattern out of these plates just like cutting out a pattern. Once you get them all cut out and flipped over you have the state of Texas. (I’m not showing you a picture here because I don’t want to spoil the end result.)
To hold all this together we went through our stash of old weathered lumber. We gathered up enough pieces for G to screw them together to form a base to mount the plates on.
Here is what it looks like once you lay them out and screw them together. You can use a Kregg Jig, or just put a smaller piece of wood (1×3) vertically along the back and screw to it from the back. Either one of these ways will keep you screws hidden.
Now you need to lay your plates down of the wood mount in the shape of Texas, and screw them in place.
Once we had them all screwed into place, G took a star brand and fancied up the corners. Here is our finished project that is hanging in the game/workout room.
G just screwed it in directly to a stud due to the weight of it. We now have Ian original piece of art work for our workout/game room. (Sorry you can see the shadow of the weight bench, but I couldn’t move it by myself.)
Go shopping at your local ReStore, Goodwill, or DMV and see what you can upcycle for your home. Let me know what you’ve done.
Linking up at:
East Coast Creative Creating With The Stars Contest. We didn’t get picked for the actual contest, so we are linking up in their mini-contest. There is some really creative ideas going on in this contest so go over and check it out.
Sugar Bee Crafts Take A Look Tuesday
Home Stories A to Z Tutes & Tips
The Ironstone Nest Transformation Tuesdays


